Brief: this plugin enables you to create a guide for other websites to be displayed on yours and showing its ranking based on one of the most known analytical websites named “Alexa”.
Firstly: Web guide plugin settings:
1-Log In to the control panel
2-From the setting list, select (Plugins settings) as the below picture:

3-A list will show up, choose (Web guide settings) as shown below:

The below setting options will show up:

-Enable Events Plus: activate or deactivate this plugin. Noting that if you deactivate this plugin, the plugin will not be displayed on the website homepage.
-Display Website Image: activate this option, so a website image will be added to the web guide.
-Display Website Rank in Alexa: activate or deactivate showing the website ranking depending on Alexa ranking.
-Display Website Page Rank In Google: activate or deactivate showing the website ranking as per as google.
-Website Icon Height: set the maximum height of the website icon.
-Website Icon Width: set the maximum width of the website icon.
-Number of sections displayed in a row: set the number of displayed sections in one row on the website.
Press (Edit Settings) to save.
After installing the plugin and editing its settings, you can create the guide easily.
Secondly: to add a new section, follow the below:
From the control panel> select plugins> web guide> then add section as shown in the below picture:

The below template will show up:

-Title: enter the name of the added section.
-Description: add some details about the added section.
-Picture: choose an image for the section.
-Display Order: enter the section display order.
-Active: to activate or deactivate the section.
Press (Submit) to add the section, or (Reset) to re enter new data.
After adding sections, you are now able to add websites.
Thirdly: to add website to section, follow the below:
From the control panel> select plugins> web guide> then list sections as shown in the below picture:

The blow template will show up:
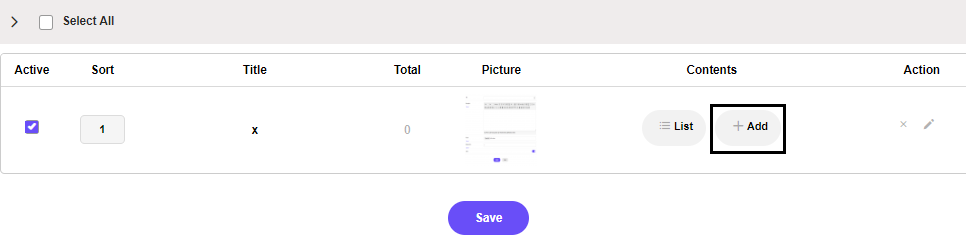
You may set the section as (active), so its contents are displayed on the website. Besides, you can change the section sorting by rewriting the section displaying order on the website.
Press (Add) to add a website and the template will show up:

-Section: enter the section to which you want to add the website.
-Title: add the website name.
-Description: write down a description of the added website.
-Website URL: enter the website link.
-Website Image: enter an image to the website.
-Active: activate or deactivate displaying the website on the website pages.
Press (Submit) to add the section, or (Reset) to re enter new data.
The website visitors can add websites to the guide published on yours, those websites will be listed a pending actions till you approve that.
Fourthly: to approve the pending added website by the visitors, follow the below:
From the control panel> select plugins> web guide> then pending requests as shown in the below picture:

The pending requests will show up, press (approve) and the website will be published.
Press (Delete) if you don’t want to approve it.
Fourthly: to view sections and websites, follow the below:
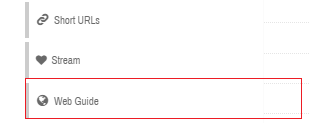
Press the “web guide icon” on the homepage as the picture below:
After pressing it, you are transferred to sections page, in which the sections are listed.
 Please Wait...


