Brief: this plugin enables you to create various types of menus such as top, lower, and side menu that may include texts, images, links or any module content.
Firstly: Menus Plugin Settings:
1-Log in to the control panel
2-From the setting list, select (Plugins settings) as the below picture:

3-A list will show up, choose (Menus settings) as shown below:

The below setting options will show up:

-Enable Menus: to activate or deactivate the plugin.
-Total number of links for the Links Group component: set the maximum number of links to be added to the links group component.
-Maximum attachment file size in megabytes: set the maximum size of the uploaded files.
-Maximum image dimensions: any uploaded picture is automatically resized to the entered dimensions.
Press (Edit Settings) to save.
Secondly: To add a new menu, follow the below:
Firstly: navigation menu:
From the control panel, select plugins> menus> then add as shown below:

The below template will show up:
-Title: enter the menu title displayed on the website.

-Type: select “navigation menu”.
-Styles: set the style used to display the menu.
-Menu width type: choose the width type which is page or screen.
-Active: activate or deactivate the menu displaying.
Press (Submit) to add the menu, or (Reset) to re enter new data.
In case the menu is submitted, you will be transferred to the below page:

Drag the component that you want to add and from the (menu components) and drop it in (menu) box, then a new menu appears as shown below:
1- (Link group) component:
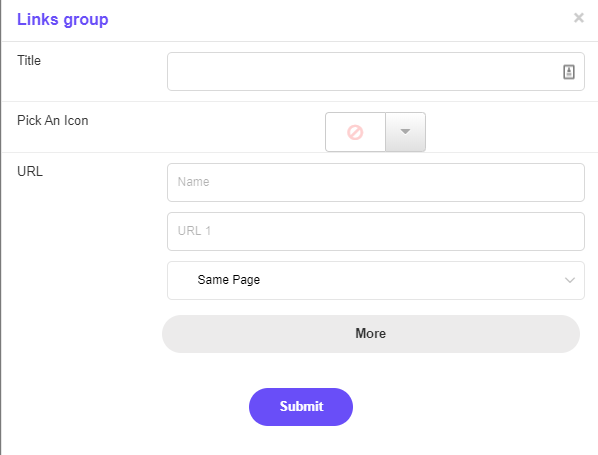
-Title: enter the name of links group.
-Pick An Icon: choose an icon for the added link.
-URL: enter the name of the added link in the first box, and the link itself in the second one, then choose whether the link will be opened on the same page or another page.
Press (More) to add multiple links.
Press (Submit) to add a link to the menu.
2- (HTML Content) Component:
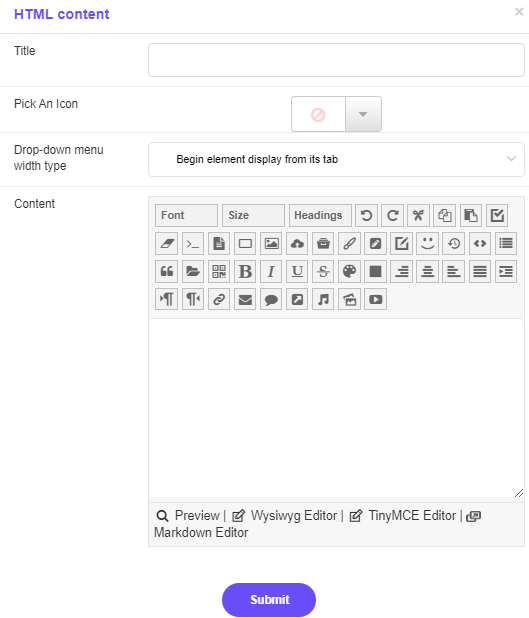
-Title: enter the name of HTML content.
-Pick An Icon: choose an icon for the add HTML content.
-Drop-down menu width type: choose the displaying method whether it is (display from its tab- or from parent tab)
-Content: enter the content itself.
Press (Submit) to add content to the menu.
3- (Module Content) Component:

-Title: enter the name of module content.
-Pick An Icon: choose an icon for the added module content.
-Drop-down menu width type: choose the displaying method whether it is (display from its tab- or from parent tab).
-Module: choose the module that you want to add its contents to the navigation menu.
-Display semi-full content in element: activate or deactivate displaying semi-full content.
Press (Submit) to add the module content to the menu.
4-(New Tab) Component:

-Title: enter the name of the new tab.
-Pick An Icon: choose an icon for the added new tab.
-Display semi-full content in element: activate or deactivate displaying semi-full content.
Press (Submit) to add a new tab to the menu.
The new tab is moved to the other box (Menu) as shown below, and you can drag the components and drop them in the new tab.

5- (Link) Component:

-Title: enter the name of link.
-Pick An Icon: choose an icon for the added link.
-URL: enter the link that you the visitor to be transferred to.
-Link Open Style: choose whether the link will be opened on the same page or another page. (Submit) to add a link to the menu.
Press (Submit) to add a link to the menu.
6-(Page) Component:
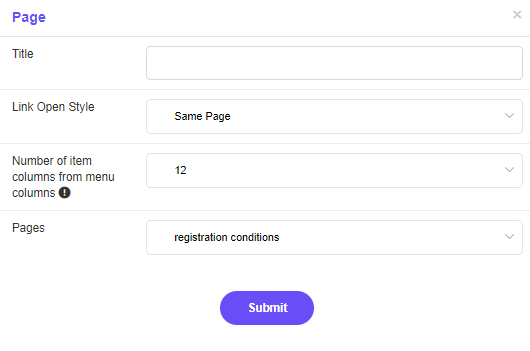
-Title: enter the name of the page.
-Link Open Style: choose whether the link will be opened on the same page or another page.
-Pick An Icon: choose an icon for the added page.
-Pages: choose pages that you want to add to the menu; those pages are previously added to the pages plugin.
Press (Submit) to add the page to the menu.
Secondly: Side Menu:
From the control panel, select plugins> menus> then add as shown below:
The below template will show up:

-Title: enter the name of the menu.
-Type: choose the menu type to be (Side menu).
-Active: activate or deactivate the menu displaying.
Press (Submit) to add the menu, or (Reset) to re enter new data.
In case the menu is submitted, you will be transferred to the below page:

Drag the component that you want to add and from the (menu components), drop it in (menu) box as explained above in the (navigation menu) template.
Thirdly: Footer menu:
From the control panel, select plugins> menus> then add as shown below:
The below template will show up:

-Title: enter the name of the menu.
-Type: choose the menu type to be (Footer menu).
-Styles: set the style used to display the menu.
-Active: activate or deactivate the menu displaying.
Press (Submit) to add the menu, or (Reset) to re enter new data.
In case the menu is submitted, you will be transferred to the below page:

Drag the component that you want to add and from the (menu components), drop it in (menu) box as explained above in the (navigation menu) template.
Thirdly: to list, edit, or delete menus, follow the below steps:
From the control panel, select plugins> menus> then list as shown below:
The below template will show up:

Select the menu type whether it is (navigation, side, or footer) menu, and a list of the menus will show up with three icons:
-Build Icon: is used to build the menus and add components.
-Edit Icon: is used to edit the menu.
-Delete Icon: is used to delete the menu.
 Please Wait...


