Brief: styles and layouts are the most significant tools that help in showing your website uniquely to the visitors. It helps as well the visitors to choose their own layout by drag and drop technique in an easy way.
Firstly: Styles:
Many techniques have been developed in Dimofinf V.5 such as, facilitating controlling and editing styles, managing HTML pages, and format files CSS, adding to the outstanding feature of searching and replacing codes and texts included in the styles files.
Styles system have various features as following:
-it is easy to add and edit styles, formats, and colours and design files.
-very developed searching system that enables you to search for a certain text in the style, edit it, and replace it by another one very easily without any need of editing codes.
-the ability to export an import styles using devices or other websites.
-display the style aligned with the layout, as Dimofinf V.5 allows you to add a new style and attach it to the layout without any need to build a new layout.
-Allow the website members and visitors to set their selected colour.
Adding to many features that are shown in the following tutorial. .
Adding style:
To add a new style, follow the below steps:
1-upload the style folder to be included in the folder named (styles) that exists in Dimofinf folder on your hosting.
2-extract the folder and provide it the (777) permission.
3-login to the control panel> select styles and layouts> styles> then add as shown in the below picture:

The below template will show up:

Title: write down the style name.
Folder Name: enter the style folder existed on your hosting with any dots or different letters.
Layout: if you have layouts, select one of them that you want to be displayed with this style.
Page Width: set the page width.
Sort: set the style displaying order.
Site Logo Image: upload the website logo, you can press (more) to add multiple pictures.
Site Logo Background Image: upload the website background picture, you can press (more) to add multiple pictures.
Press (submit) to add the style, or (reset) to re enter new data.
If you press (submit), the below options will show up to adjust the style:

Minimize Modules Tickers ?: to activate showing one ticker.
Ticker Type: to select the ticker type.
Ticker Speed: set the speed of the ticker.
Random Titles ?: activate or deactivate displaying random titles.
Rounded Ticker ?: activate or deactivate the rounded tickers.
Social Icons: you may activate displaying the social media icons and enter each platform link in the below fields.
Show Date ?: if you press yes, the style date is shown.
Show Last Update Date ?: activate or deactivate displaying the recent date of the new style.
Press (submit) to save the style or (reset) to re enter new data.
List Style:
To list, edit, or delete styles, follow the below:
From the control panel> select styles and layout> styles> then list as the picture below:

The below picture will show up:

Design:-
Modify: to edit the HTML files codes which requires a programming experience.
Style Guide: to edit the style format and colours, it belongs to the version CSS files.
Action:-
View icon: to view the style after editing.
Edit icon: to edit the style data.
Delete: to remove the style that you don’t anymore need.
Search in Templates:
To search and replace in templates, follow the below:
From the control panel> select styles and layout> styles> then search in templates as the picture below:

The below picture will show up:

Search In Templates
Search In Style: choose the style that you want to search in.
Search For Text: enter the text that you search for.
Case-sensitive: activate or deactivate the identification feature.
Press (search) to find and edit the text that you search for, or (reset) to re enter new data.
Find and Replace in Templates
Search In Style: choose the style that you want to search in.
Search For Text: enter the text that you search for.
Replace with Text: enter the text that you want to add instead of this one.
Case-sensitive: activate or deactivate the identification feature.
Press (replace) to find and edit the text that you search for, or (reset) to re enter new data.
In case you press (replace), you are transferred to the results page to proceed and confirm replacement.
Export/ Import Styles:
To import or export styles, follow the below:
From the control panel> select styles and layout> styles> then import/ export styles as the picture below:

The below template will show up:

Styles: choose the style that you want to download or export.
Layout: choose the layout that you want to download or export with the style.
Copy The Activated Components Blocks From The Selected Layout: if you installed the content creator plugin, and you have activated blocks in the selected layout, so you can copy these blocks to the style that is exported or downloaded.
If you press (export), the compressed folder is saved in (Styles) folder that existed in Dimofinf version save on your hasting space.
In case you press (download), the compressed folder is downloaded and saved in your device space.
Secondly: Layout:
Brief: layout helps the website admin to arrange the website format very smoothly, adding to creating layouts and scheduling them, so the website can be displayed in a different layout daily. As well as, Dimofinf V.5 provides the live layout which allows the admin to create and edit the layouts interactively and live on the website interface. That allows all changes to be displayed while they are executed, and the members can manage layout by themselves.
Layout has various features as mentioned below:
-easy to add layouts using the default layout.
-allow the members to add and design their own layouts.
-the ability of importing and exporting the layouts.
-scheduling the layout outs to be displayed on certain events or vacations overriding the users settings.
Creating layout:
To create a layout, follow the below:
From the homepage> press the icon (list)> then create layout as shown in the below picture:

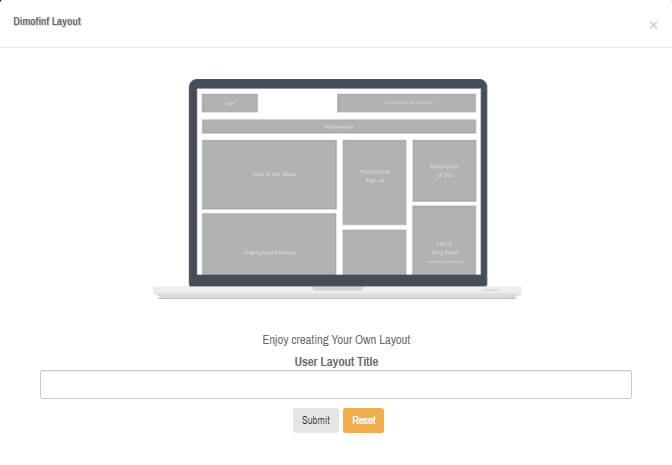
Enter the layout name, then press (submit) to save, or (reset) to remove the name and enter a new one.
List layouts:
To list, view, and delete layouts, follow the below:
From the control panel> select styles and layouts> layouts> then list as shown in the below picture:

The below template will show up:

View: this icon is used to view the layout.
Delete: this icon is used to delete the layout.
Import and export layouts:
To import or export layouts, follow the below:
From the control panel> select styles and layouts> layouts> then import & export layouts as shown in the below picture:

The below template will be shown:
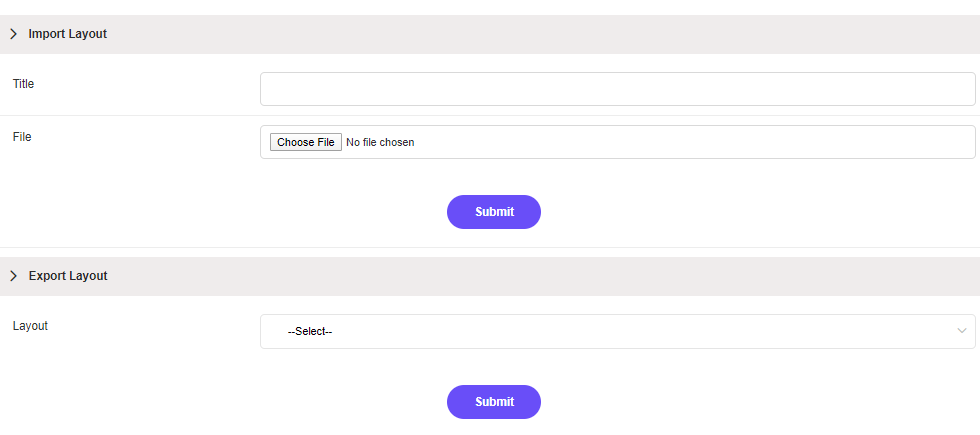
Import layout:
Title: enter the title of the layout that you want to import.
File: upload the layout file that you want to import.
Press (submit) to import the layout and it will be shown on the (list layouts) page.
Export layout:
Layout: choose the layout that you want to export to your device.
Press (submit), so the layout is exported and downloaded to your device.
List users’ layouts:
To list, view, or delete the users’ layouts, follow the below:
From the control panel> select styles and layouts> layouts> then list users’ layouts as shown in the below picture:

The below template will show up:

View: this icon is used to view the user’s layout.
Delete: this icon is used to delete the user’s layout.
Scheduling Layouts:
You can schedule layouts to start and end at certain times by following the below:
From the control panel> select styles and layouts> layouts> then list users’ layouts as shown in the below picture:

Th below template will show up:

Press (Add layout scheduling) and the below page is shown:
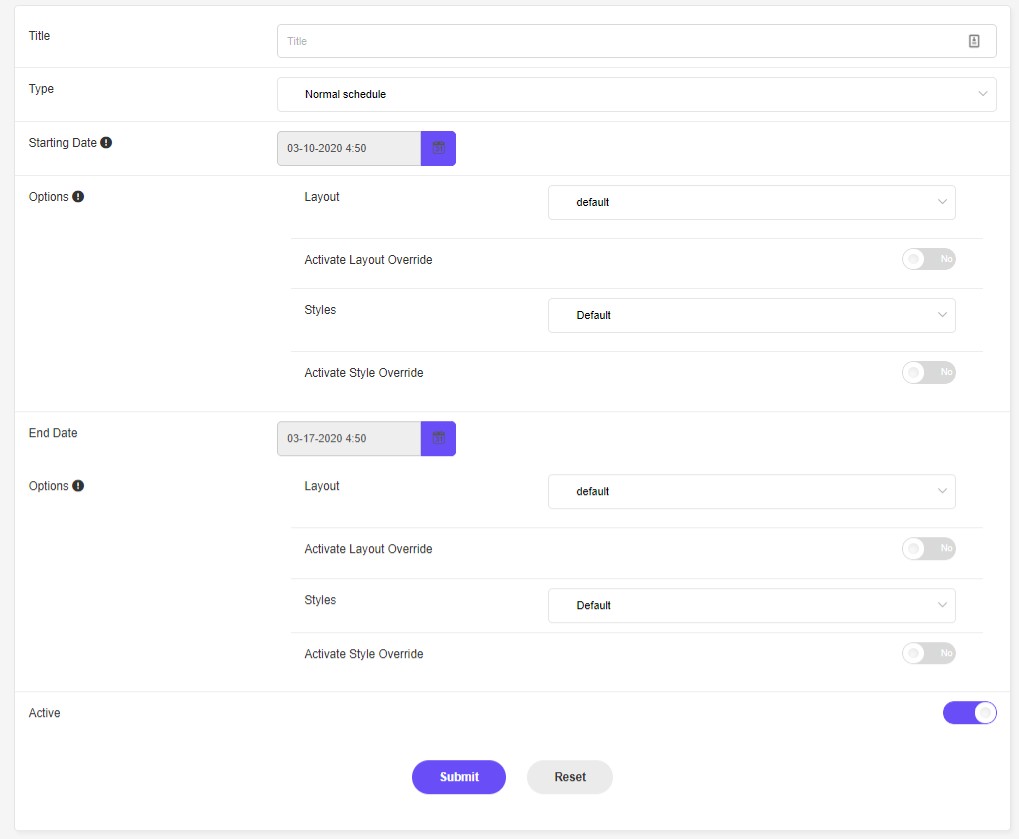
Title: enter a title to the schedule.
Type: choose the scheduling type whether it’s (normal- recurring) as the normal one is related to starting and ending date, but the recurring one is related to a certain day and time.
Starting Date: set the starting date which belongs to the normal scheduling.Or if you choose recurring one, this field will change to “day” and “time”.
Options: set the options that you want to be executed while the scheduling starts, they include the scheduled layout, style, and activation of members’ style and layout editing.
End Date: set the end date which belongs to the normal scheduling.Or if you choose recurring one, this field will change to “end day” and “time”.
Options: set the options that you want to be executed while the scheduling ends, they include the scheduled layout, style, and activation of members’ style and layout editing.
Active: activate or deactivate the scheduling.
Press (submit) to save, or (reset) to re enter new data.
If you press (submit), the scheduling will be saved and you will be transferred to the scheduling page as shown below:

Edit Icon: is used to adjust the scheduling.
Delete: is used to delete the scheduling.
 Please Wait...


