Brief: this plugin helps in organizing Google ads as it allows you to control the advertisement size, its location on the website and other features that enable you to manage the ads easily.
Firstly: settings:
1- Login to the control panel
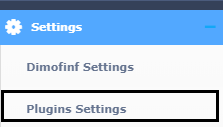
2- from the side list, select (settings)> then (plugins settings) as the picture below:
3- the settings list will show up, choose (Google Adsense settings) as the picture below:

The below page appears:
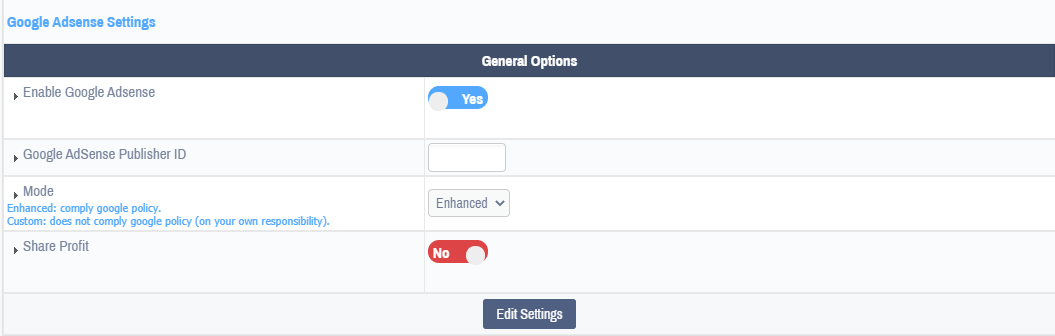
-Enable Google AdSense: activate or deactivate the plugin.
-Google AdSense Publisher ID: enter your publisher ID of google ads.
-Mode: choose the ads showing mode; (enhanced) follows Google policy, and (custom) doesn’t follow Google policy and the ads displaying mode is on your own responsibility.
-Share Profit: enable or disable the profit share.
Secondly: Adding an ad. :
1- Login to the control panel
2- from the plugins list, select (Google Adsense)> then (add) as the picture below:

The below template will show up:
-Ad Name: enter the name of the advertisement that you want to add.
-AdSense Ad Slot ID: enter your slot ID of the Google adsense.
-Ad Type: choose the ad type whether it is (text and image, text only, or image only).
-Size: set the size of the ad.
-Active: enable or disable the ad.
-Module: choose the module where the ad is displayed.
-Corner Style: choose the corner style of the displayed ad whether it is square or round.
-Border: set the color of the ad borders.
-Title: set the color of the ad title.
-Background: set the color of the ad background.
-Text: set the color of the ad text.
-URL: set the color of the ad URL.
Thirdly : List Ads.:
1- Login to the control panel
2- from the plugins list, select (Google Adsense)> then (add) as the picture below:

3- All ads appear, so you can edit or delete any of them.
 Please Wait...


