Brief: this tutorial shows how to upgrade your website from version 2.0.5 to version 4.0.0 in simple quick steps.
Preparation Steps:
1- Close your website by using Dimofinf settings in the CMS control panel.
2- create a new database using the hosting cpanel.
3- create a backup of the main database.
Note: if you upgrade using a subfolder before being viewed by visitors, this folder has to be named (upgrade) otherwise, CMS will not work.
Setting Steps:
To get your CMS version, login to the website control panel and follow the below steps:
1- login to your client area using your email address and password.
2- your main page is shown, press (active services) and a list of your services appears.
3- press the button (view details) in front of the CMS license key.
License key: copy and paste it in config.php file before starting installing “step 7”.
License domain: is the domain certified to be used in installing the CMS.
Installing CMS version.
4- download the version on your device.
5- extract the file.
6- open the file (include), you will find inside another file named (config.php.new), change the file name to (config.php) and delete the extension (.new).
7- open the file(config.php) and add the below data:
License Key: it is shown in the service page on the client area page as mentioned previously.
CODE :
$setting ['LicenseKey'] = '';
$setting['Databasename'] = 'dbname';
$setting['MasterServerusername'] = 'dbuser';
$setting['MasterServerpassword'] = 'password';
Save editing.
8- upload the extracted folder to your website where you want to install a new version (or upload the compressed folder and then extract it using the cpanel).
9- provide the 777 permission to the below folders through the cpanel.
Folder : contents
Folder: styles
Folder : contents/datastore
Folder: contents/datastore/layout
File: contents/datastore/datastore_default.php
File: contents/datastore/rout.data.php
File: contents/datastore/l.dat
10- move the below folders from version 2.0.0 to (contents folders) in version 4.0.0.
-List of folders that are moved.
leqaa
maqal
omsyat
publishes
bsaidabout
ssaidabout
downloads
progrec
progrecf
Upgrading Steps:
-recall the file (upgrade.php) using the browser as per the uploaded folder, for example:
http://www.DOMAIN.TLD/install/upgrade.php
Bearing in mind that you have to replace (DOMAIN.TLD) with your website domain.
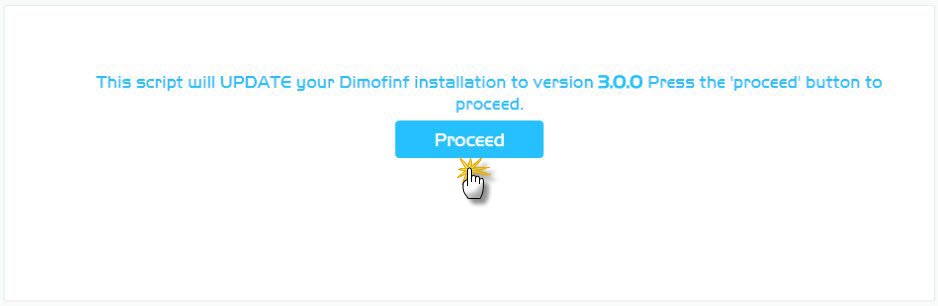
1- the below welcome message is shown to start the first steps in upgrading CMS to version 3 firstly before the upgrading to version 4. Press (proceed) as shown below:
2- after the CMS is upgraded to version 3, a new step appears which is converting database encoding to UTF8. Press (proceed) as shown below:
- a new message appears to start the process, press (proceed).

-The process may take a long time depending on the database size.
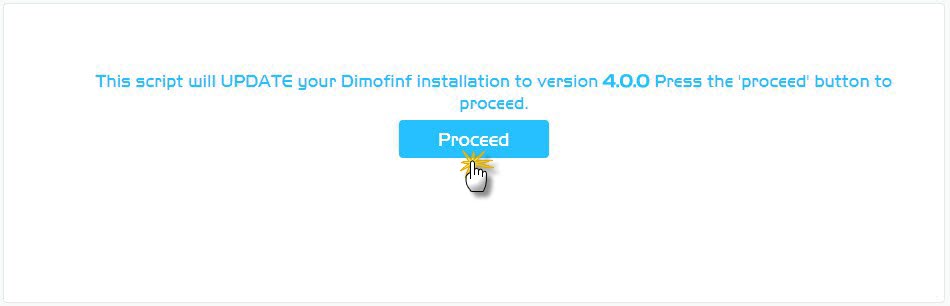
3- the next step is to start upgrading to version 4, press (proceed) as the picture below:
4- the third step is to activate CMS modules and plugins included in the folder (include/ plugins/) as the picture below:
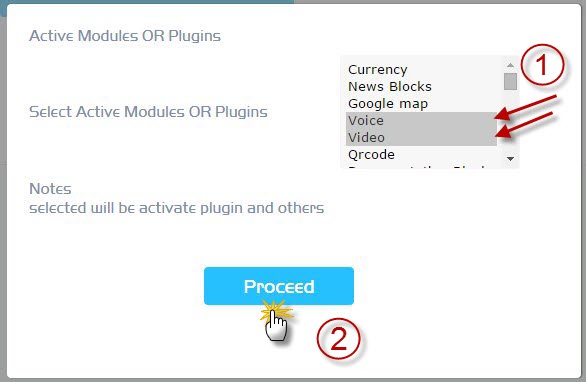
Choose plugins and modules that you want to activate, and then press (proceed) as the previous picture. Noting that the activate modules and plugins of version 3 are automatically chosen by the system.
-this step may nor be shown if the plugins folders don’t include a plugin or if the installing is tackled for the first time.
5- after that, a message is appeared as below to enter some data:
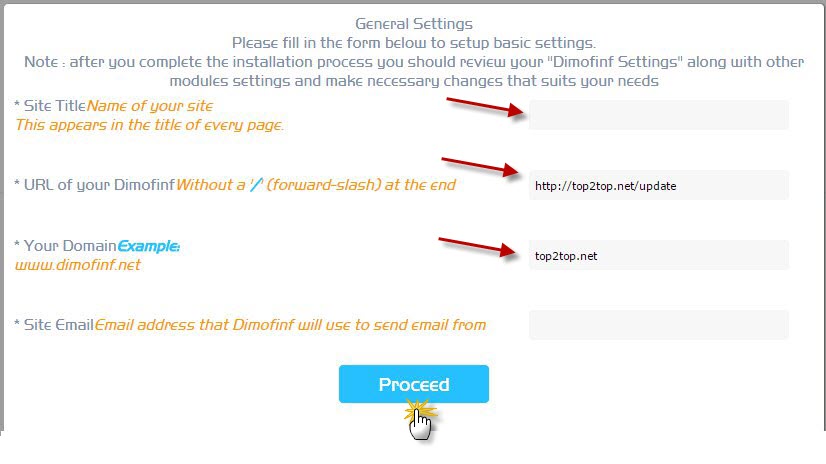
-Site title : The website name such as (sabaq newspaper, etc)
- URL of your Dimofinf : CMS URL on your website.
- Your Domain: the website domain.
- Site mail: the approved email address that is used to send messages from your website.
-if the upgrading is proceeding using a sub folder, you have to enter the folder name after the sign (/) in the cookies field and add (/) after the folder name.
6- after the installing process is done, a new template will show up to enter some data of the website admin as shown in the below picture:
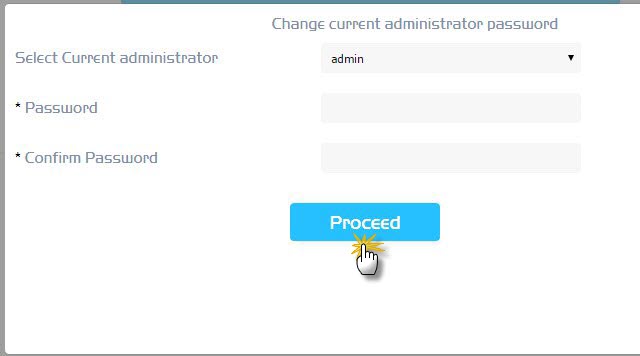
- Select Current Administrator: from the previous admins, choose one to be the main current administrator.
- Password: enter the new password of the current admin account.
- Confirm Password: re enter the previous password.
After filling the required fields, press (proceed) as shown in the previous picture.
7- then, the system asks you to enter the user that all data will be published by his name as the picture below:
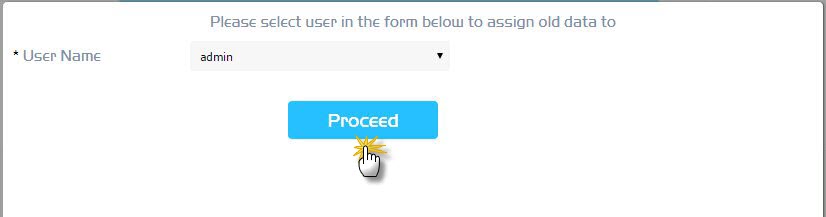
Choose the user and press (proceed) as the previous picture.
8- after the upgrading process is done, the below picture will show to delete the folder (install) for security wise. So, delete the folder and press (proceed):
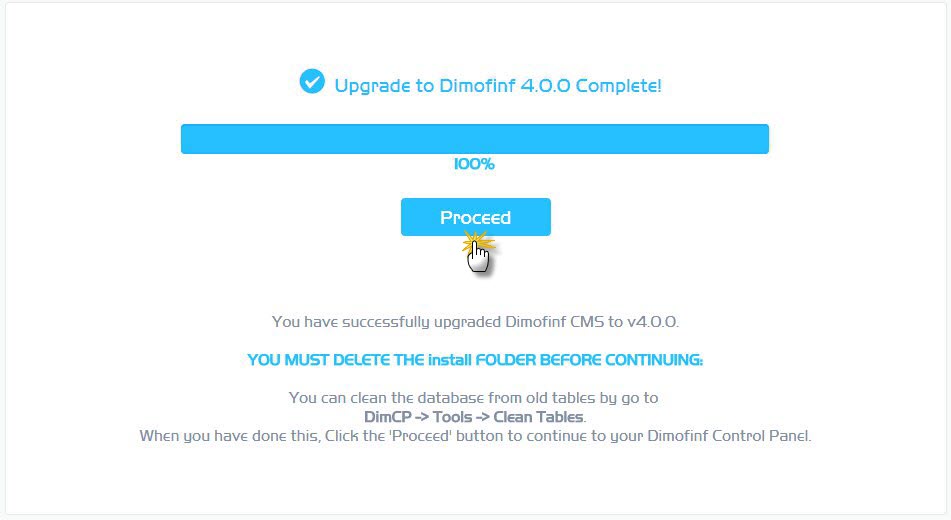
After pressing (proceed), you are transferred to the CMS control panel using the data entered in step 5 (username and password).
9- after logging to the CMS control panel, a very important window is shown including FTP data, and Dimofinf store one.
-Note: the store data is sent to your email address registered in the website, so login to your email inbox to get the data.
The window explanation:
- FTP Host: the server name of the FTP account.
- FTP User: the FTP username.
- FTP Password: the FTP account password.
- FTP Port: the port number of your FTP account.
- CMS FTP Folder: the name of the folder that includes the CMS files.
- Store Username: Dimofinf store username (sent to your email address after purchasing the CMS version)
- Store password: Dimofinf store password (sent to your email address after purchasing the CMS version)
- Use SSL FTP: enables you to use the secured login to FTP.
 Please Wait...


