Brief: this feature allows you to adjust the module settings of its sections, and managing its blocks.
To manage company module settings:
1- Login to control panel.
2- From the side list, select “Settings”, then “plugins Settings” as shown in the below picture:

3- The below list appears, select “company settings” as the picture below:

The below page will show up:
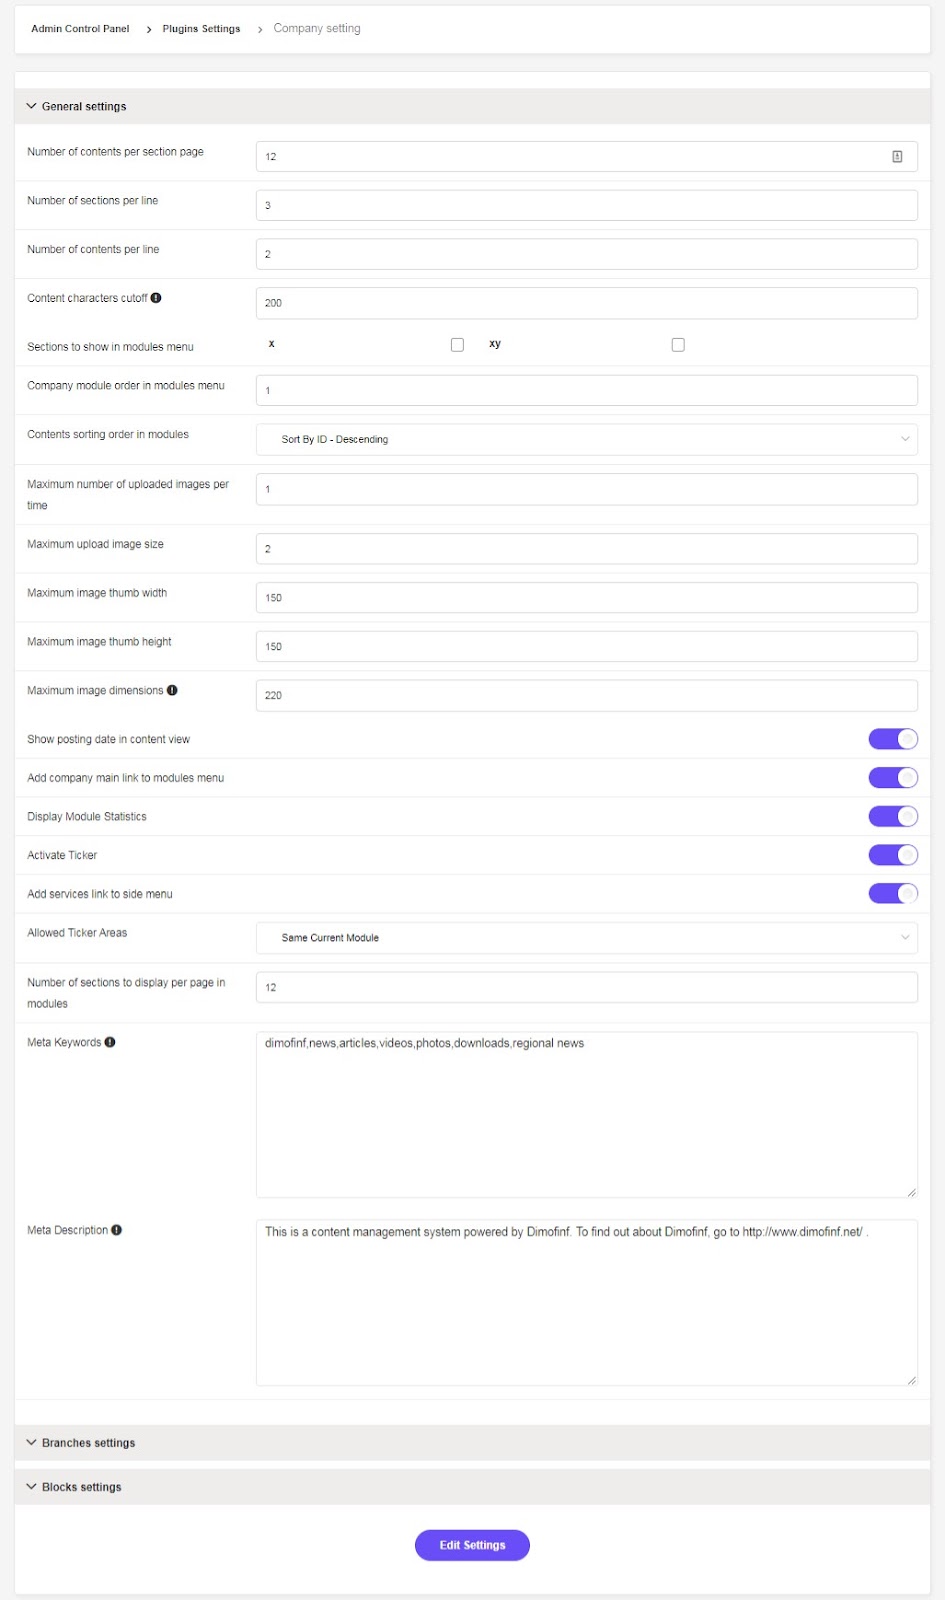
Firstly: General Settings:
-Number of contents per section page: set the number of articles to be displayed on every section page. For example, if you have 100 articles for every section, and you want to show 20 ones in every page, so that you will have 50 pages in this section. A numbered list of pages will be shown beneath the articles.
-Number of sections per line: set the number of displayed section in each row on the internal pages.
-Number of contents per line: set the number of contents shown in each row on every module page.
-Content characters cutoff: set the maximum number of characters used to enter a brief under the content.
-Sections to show in modules menu: select sections that are shown in the website side list, noting that if you don’t select any sections, the company module will not be shown in the side list.
-Contents sorting order in modules: you can set the criteria to order the contents displayed on the website pages.
-Maximum number of uploaded images per time: Dimofinf V.5 allows to upload any number of pictures attached to every content. So this feature helps in setting the maximum number of uploaded pictures for every single content. Noting that, if there are numerous uploaded pictures, they will be displayed in sliders through which the visitor can move.
-Maximum upload image size: any uploaded picture will be automatically resized to this number.
-Maximum Image Thumb Width: (Thumbnail images) if little size of the original pictures that you upload to the website, those little images are displayed on the website pages except for the content page for the website speed.
Set the thumbnail images width and height to be maximum 75.
-Maximum Image Dimensions: the uploaded picture will be automatically set as the entered dimensions. It is preferably to set a realistic dimension for the picture high quality. The more the picture dimensions increase, the more space you need.
-Show posting date in content view: Activate this option, so the date is shown with all added contents.
-Add company main link to modules menu: Activate this option, so a link of the company module is shown in the modules list on the website.
-Display Module Statistics: the (Statistics Block) is a main one that is not belonged to a certain module and can be added to any page.
This block shows the number of contents of every module and the date of the recent added content.
-Activate Ticker: it allows the recent posts to be displayed automatically.
-Allowed Ticker Areas: set the allowed locations to show the ticker; whether to be shown only on the internal pages, homepage, or all the pages.
-Number of sections to display per page in modules: set the number of displayed section in every page. If there are 10 sections and you set 5 section for each page, so you will have 2 pages for sections. A numbered list of pages shows up beneath the sections.
-Meta Keywords: enter meta keywords that fit the blogs module, to be included in every content published on the website pages.
Use this feature if you want to add meta keywords to all the module contents that has no previous meta keywords before being published.
Secondly: Branches Settings:

-Number of branches on branches page: set the number of branches shown in every page.
-Add branches link to modules menu: activate this option, so the branches link is shown in the modules list on the website.
-Add work time in details: Activate this option, so working hours are displayed after adding any branch.
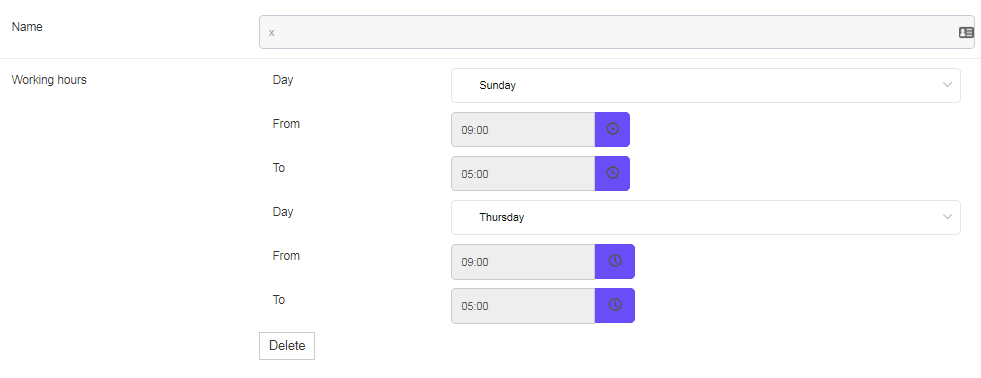
If this option is deactivated, the working hours are shown as below:

-Number of branches in branches block: set the number of branches displayed in each block, this block can be added using the default layout.
-Maximum distance to show branches in map block: set the distance between the researcher location and your company location to be for example, 15KM. So Google map will show all branches that are available in this distance.
Important Note: to use the previous option, you have firstly to install SSL certificate, so your website starts with https not http. This condition is applied from Google it self not Dimofinf.
Thirdly: Blocks Settings:

-Sections to view as blocks: set the module section you want to display them as blocks on the website.
After that, you can add blocks on your website.
-Number of contents in Latest block and sections viewed as blocks: set the number of contents shown in the block (recent added) and blocks displayed as sections.
-Maximum number of content in timeline and sections blocks: set the number of content you want to be displayed in the block (timeline) and sections block.
-Sort contents in block by: set the criteria through which the contents are displayed as shown below:

Press (Edit Settings) to save.
-Blog Displaying Method: to display the blocks of the module, press the icon (List) in the header, activate default layout, then press (Add Block), use (Filtration or searching feature to display blog blocks only), then drag the block to set it desired location.
For more details about how to use the default layout, press Default Layout Explanation
 Please Wait...


